We’ve managed to achieve some pretty impressive
results by using the tools that are available out of the box with Excel
2010 and Excel Services. However, one of the areas from our
demonstration scenario that we haven’t properly addressed is the
requirement to dynamically convert the sales data to a range of
currencies. We’ve designed our workbook to allow for such a calculation;
we just haven’t done the actual calculation part yet, and there’s a
good reason for that: Excel doesn’t have a function for automatically
retrieving exchange rates for a stated currency.
In this section, we’ll create a
UDF that accepts a currency code as an input parameter. The function
will then connect to a web service to retrieve a current exchange rate
for the selected currency and will pass the resulting value back to
Excel for use by the calculations within our workbook.
Attributes Used when Creating UDFs
UDFs are simply managed
code assemblies that have been marked up using specific attributes that
denote methods and classes that are callable from Excel Services. The
attributes in question can be found in the
Microsoft.Office.Excel.Server.Udf namespace, which is defined in the
Microsoft.Office.Excel.Server.Udf.dll assembly. The following attributes
are available.
UdfClassAttribute
This attribute is applied to a
public class and is used to denote that the class may contain UDFs that
can be used by Excel Services.
UdfMethodAttribute
This attribute can be
applied to public methods and is used to indicate that the method is a
UDF and can be used by Excel Services. The UdfMethodAttribute accepts a couple of properties:
IsVolatile
This Boolean value specifies
whether or not the UDF should be considered volatile. When referring to
Excel functions, specifying that a function is volatile indicates that
the function should be reevaluated whenever any value in the workbook
changes. The default behavior is non-volatile, which means that the
function is reevaluated only when any of the parameters that are passed
into it change. Generally, the default behavior is appropriate unless
the UDF is reading other related data behind the scenes that may have
changed as a result of activities elsewhere in the workbook.
ReturnsPersonalInformation
This Boolean value
determines whether the identity of the calling user can be accessed via
the executing thread’s current principal. This means that where this
value is set to true, details of the calling user can be retrieved as
follows:
[UdfMethod(ReturnsPersonalInformation = true)]
public string GetCallersUsername()
{
  if (Thread.CurrentPrincipal.Identity != null)
  {
    return Thread.CurrentPrincipal.Identity.Name;
  }
  else
  {
    return string.Empty;
  }
}
Usable Data Types Within UDFs
The .NET Framework
contains many different data types, and any of these types can be used
as a parameter or return value for a method. However, as you may
imagine, Excel doesn’t necessarily know how to process each and every
data type and can therefore use only a small subset of the types
available. General speaking, only types defined in the System namespace
are supported, such as String, Boolean, DateTime, and Object. Exceptions
to this rule are Int64 and UInt64, which are not supported.
As well as passing simple
values, contiguous ranges can also be passed into a UDF as one- or
two-dimensional object arrays. For example, the following two functions
accept a single row and a range of cells, respectively:
[UdfMethod]
public int ProcessSingleRow(object[] row)
{
  return row.Length;
}

[UdfMethod]
public int ProcessRange(object[,] range)
{
  return range.Length;
}
Creating a UDF Using Visual Studio 2010
For most of our code samples
throughout this book, we’ve made use of the SharePoint 2010 templates
that are available in Visual Studio. Since a UDF is simply a managed
assembly, we can create it using a basic class library project. We can
then configure SharePoint to pick up the assembly from the file system
whenever it is required by a workbook.
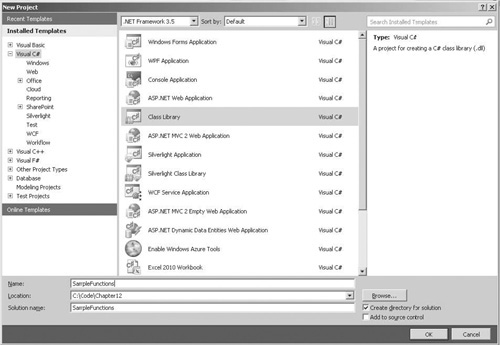
Open Visual Studio 2010. Choose File | New | Project.
Create a new Class Library project and name it SampleFunctions, as illustrated:
Rename Class1.cs to CurrencyConvertor.cs.
As
mentioned, this UDF will make a web service call to obtain a current
exchange rate. Before we add the code for the UDF function, we need to
add a reference to the web service. Choose Project | Add Service
Reference.
The
Add Service Reference wizard is used to create WCF service references.
Generally speaking, this wouldn’t cause any problems. However, the web
service to which we’re connecting makes use of the ISO-8859-1 encoding
standard, and unfortunately the binding types provided with WCF don’t
support this standard. Rather than writing a load of code to support the
standard in WCF, we’ll work around the problem by creating a .NET 2.0
Web Reference instead. Click the Advanced button in the Add Service
Reference dialog and then in the Service Reference Settings page, click
the Add Web Reference button.
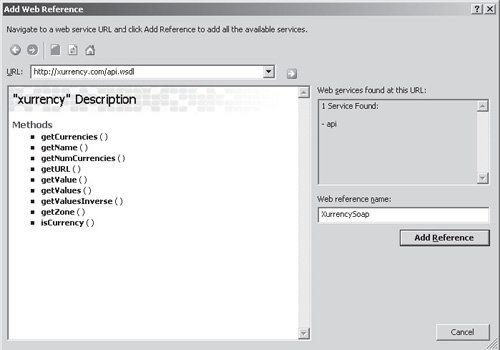
In the Add Web Reference dialog’s URL text box, enter http://xurrency.com/api.wsdl.
Type XurrencySoap in the Web Reference Name text box, as shown, and then click Add Reference to generate a proxy for the web service.
Before
we can add our UDF method, we need to add a reference to the Excel
Services UDF Framework. Choose Project | Add Reference. In the .NET tab,
select Excel Services UDF Framework. Click OK to add the reference.
We’re now ready to add some code to our CurrencyConvertor class. In the CurrencyConvertor.cs file, add the following code:
using System;
using Microsoft.Office.Excel.Server.Udf;

namespace SampleFunctions
{
  [UdfClass]
  public class CurrencyConvertor
  {

    [UdfMethod(IsVolatile = false, ReturnsPersonalInformation = true)]
    public double GetExchangeRate(string currencyCode)
     {
      XurrencySoap.xurrency client = new XurrencySoap.xurrency();
      client.Url = "http://xurrency.com/servidor_soap.php";
      return client.getValue(1, "usd", currencyCode.ToLower());
     }
  }
}
Notice a few things about this short code sample. First, the CurrencyConvertor class is marked as public and has the UdfClass attribute attached. Second, the GetExchangeRate method is also marked as public and has the UdfMethod attribute attached.
Within the GetExchangeRate method, we create an instance of the XurrencySoap web service proxy class, and then we use the proxy to call the getValue method. Since getValue
actually performs a currency conversion rather than simply providing
the exchange rate, we’ve specified via our parameters that the method
should return the value of $1 when converted into whatever currency code
is passed into the function.
Configuring UDFs for Development
We’ve created a simple UDF
using Visual Studio. We can now build the project and then move on to
make the necessary configuration changes within SharePoint. As discussed
earlier, configuration of Excel Services is done via the Central
Administration tool.
Open Central Administration and then select Manage Service Applications in the Application Management section.
Select
Excel Services from the list of application either by clicking the
Excel Services hyperlink or by highlighting the Excel Services row and
then clicking Manage from the Service Applications menu.
We can configure UDF assemblies by clicking the User Defined Function Assemblies link on the Manage Excel Services page.
When it comes to adding UDF
assemblies, we have two options. We can either place the assembly in the
GAC or we can access it directly from the file system. For development
purposes, reading the assembly from the file system is easiest since we
can simply build the project on our development machine and the new
assembly will be immediately available to SharePoint without us having
to take any additional steps. However, bear in mind that reading
assemblies directly from the file system represents a significant
security risk. It’s a trivial task to tamper with the assembly and have
it perform all kinds of nefarious acts under the security context of any
unfortunate Excel user who happens to open a workbook that references
the function. It is therefore best practice to sign all UDFs on
production servers and deploy them to the GAC.
Let’s look at how we’d configure an assembly to be picked up from the file system and how we can debug UDFs.
Click the Add User-Defined Function Assembly link.
Select File Path as the Assembly Location.
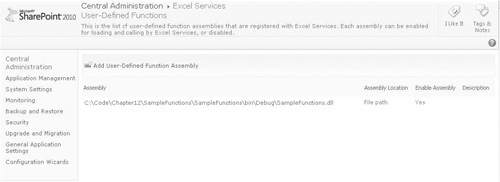
In the Assembly text box, enter the path to the assembly. In our case, we’ll enter C:\ Code\Example\SampleFunctions\SampleFunctions\bin\Debug\SampleFunctions.dll.
Click OK to add the assembly. The User-Defined Functions page will look as illustrated:
Using UDFs Within Excel
We can now make use of our custom function in our Excel workbook.
If
it’s not already open, in our sample site, navigate to the Excel
Workbooks document library and open the Last30DaysSales workbook using
the Excel client application.
Switch to Sheet2, and in the cell B1, enter the following formula:
=IFERROR(GetExchangeRate(CurrencyCode),1)
This formula simply calls our UDF GetExchangeRate and passes in the value of the CurrencyCode named range. The call to our UDF is wrapped in an IFERROR
function so that data is still rendered on the client if an error
occurs. Where an error occurs, we’ve used an exchange rate of 1, which
will effectively generate charts and PivotTables based on the raw data
as opposed to a pile of #NAME? or #VALUE? errors. Note that UDFs are not
accessible within Excel client and will always display a #NAME? error.
Commit
the changes to SharePoint by clicking the Save button in the upper-left
corner. We can use the Save button in this instance because the
underlying metadata hasn’t changed. We don’t need to use the Publish to
Excel Services function that we used previously.
Using the REST API to Test a UDF
As it stands, we don’t have a
user interface to switch between currency codes, but we can check that
our UDF is working properly by using the REST API. In a web browser,
enter the following URL:
http://localhost/Example/_vti_bin/ExcelRest.aspx/Excel%20Workbooks/Last30DaysSales.xlsx/model/Ranges(‘ExchangeRate’)?Ranges(‘CurrencyCode’)=AUD
This URL is using the REST API to return the contents of the ExchangeRate named range when the CurrencyCode named range contains the value AUD. In other words, we’re using the REST API to display the exchange rate between USD and AUD. The resulting output should be a number similar to 1.15, depending on the actual exchange rate at the time you call the API.
If the number 1 is returned, this indicates that you’ve either set the CurrencyCode to USD (or left it blank) or an error has occurred. The value of 1 is returned because we wrapped our UDF call in an IFERROR function within Excel.
Debugging UDFs
Debugging UDFs is not
quite as simple as debugging other SharePoint artifacts. The UDF is
called by the Excel Services service application, which runs as a
separate process. Bearing this in mind, we have two options: we can
either attach our debugger to all instances of the w3wp.exe process, or
we can find out which process is being used to run service applications
on our server.
Discovering the ProcessID Used to Run a UDF
Even though most of us will
take the lazy option of attaching to all worker processes, here’s how
we can find out the correct Process ID.
As mentioned, Excel Services
runs under a separate process. All service applications running on a
server are published under the SharePoint Web Services application in
Internet Information Server 7.0 (IIS7) and run within a specific
application pool. Knowing the name of this application pool is important
when we’re working with UDFs since we may need to recycle it to free up
locked assemblies.
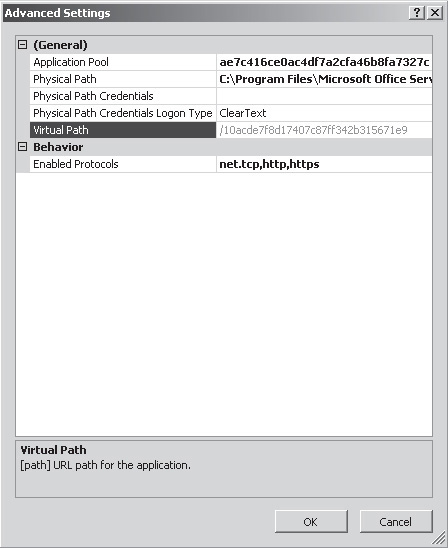
In IIS Manager, navigate to the SharePoint Web Services site, expand the root node, and select the first service application.
From the Actions pane, select Advanced Settings. In the General section, the name of the Application Pool appears:
Armed
with the name of the application pool, we can now do a bit of digging
to discover the Process ID. Open a command prompt and navigate to the
C:\Windows\System32\ inetsrv folder.
Enter the following command to list all the worker processes that are being used by IIS:
The returned list will be formatted as follows:
WP "7260" (applicationPool:SharePoint - 80)
WP "7444" (applicationPool:SharePoint Central Administration v4)
WP "4556" (applicationPool:1c549b9ed5ad4dac8e977df6da3c733b)
WP "4428" (applicationPool:ae7c416ce0ac4df7a2cfa46b8fa7327c)
The first column, WP,
identifies the type of record—in our case worker process. The second
column contains the process ID, and the last column contains the
application pool that is using the process. By finding the process that
corresponds to our SharePoint Web Services application pool, we can
determine the process ID.
Note that the
process ID may change between debugging sessions, but the application
pool name will remain constant unless SharePoint is reinstalled.
Manually Attaching the Visual Studio 2010 Debugger
Now let’s manually attach the Visual Studio Debugger and recycle the SharePoint Web Services application pool.
In Visual Studio 2010, choose Debug | Attach to Process.
Select the w3wp.exe process with the correct ID value, and then click Attach.
Add a breakpoint within the UDF function. Execution will stop on the breakpoint, allowing debugging to take place.
You’ve seen how to debug
UDFs using Visual Studio; now let’s step into our UDF code. What happens
if we need to make changes to our code and recompile our assembly?
You’d think it would simply be a case of clicking the Build button, but
unfortunately it’s not quite that straightforward if we’ve configured
SharePoint to pick up the UDF from our bin folder. The Excel Services
service application will maintain a lock on the file while it’s in use,
making it impossible for Visual Studio to overwrite when compiling a new
version. Thankfully, this is an easy problem to fix. All we need to do
is recycle the SharePoint Web Services application pool and the lock
will be released. This can be done using IIS or using the command line
by entering the following:
appcmd recycle apppool /apppool.name:<the name of the app pool>
Configuring UDFs for Production
You’ve already learned the two
ways for SharePoint to reference UDF assemblies: either directly via
file path or indirectly via the Global Assembly Cache. I covered the
steps required to reference an assembly via a file path in a development
environment and the steps required to debug UDF assemblies.
Now that development of our UDF is complete, let’s take a look at the steps required to reference our assembly via the GAC:
Within
Visual Studio, right-click the SampleFunctions node in the
SolutionExplorer pane. Select Properties from the context menu.
In the Solution Properties Designer, click the Signing tab and check the Sign The Assembly checkbox.
From the Choose A Strong Name Key File drop-down, select <New...> to create a new Strong Name Key.
Now
that we’ve specified that the assembly should be signed, we must
recompile it before the signature is applied. Choose Build | Build
SampleFunctions.
Now copy our assembly to the C:\Windows\Assembly folder to register it with the Global Assembly Cache.
Switch
over to the SharePoint 2010 Central Admin site, where we’ll change the
UDF configuration within the Manage Excel Services page. Delete the
previous development entry for SampleFunctions.dll.
Click Add User-Defined Function Assembly. Set the Assembly Location to Global Assembly Cache.
To find the strong name for our assembly, switch back to Visual Studio 2010. Either press CTRL-ALT-A or choose View | Other Windows | Command Window to display the Visual Studio Command Window.
In the command window, enter the following command:
? typeof(SampleFunctions.CurrencyConvertor).Assembly.FullName
The resulting output will be the strong name for our assembly:
SampleFunctions, Version=1.0.0.0, Culture=neutral,
PublicKeyToken=your-token-here
Copy this value into the Assembly text box on our Add User-Defined Function Assembly page, as shown:

Click OK to register the assembly and then recycle the SharePoint Web Services application pool to pick up the new reference.
We can now test using the
REST API URL that we created earlier to confirm that our assembly is
being correctly picked up from the GAC.